Gravity Retaining Wall Installation
Below is a step by step Gravity Retaining Wall Installation process. This is to be used as a guide and instruction manual of the proper procedures needed to install a MaxumStone project correctly and efficiently. All information provided is to be used at the discretion of the user.
- MaxumStone is available in 0 / 2.4 / 4.5 degree batter (setback) Check with your local producer for availability.
- Face textures vary from producer to producer. Please check with your local sales representative for more information and styles available.
- It is always recommended that a qualified engineering consultant be hired for all projects by the owner of the gravity retaining wall project.
- Call before you dig. These are typically free services in most counties and jurisdictions. They will come to the site and mark out where all of the utilities are underground.
Canada Website – https://digsafecanada.ca/
Unites States of America Website – http://call811.com/
Australia – https://www.1100.com.au/
United Kingdom – https://www.national-one-call.co.uk/
New Zealand – https://www.beforeudig.co.nz/nz/home/
- Soils test and analysis should be performed before design and excavation are performed. Understanding and utilising the correct soils information will help to determine the length depth of excavation and gravity retaining wall pieces.
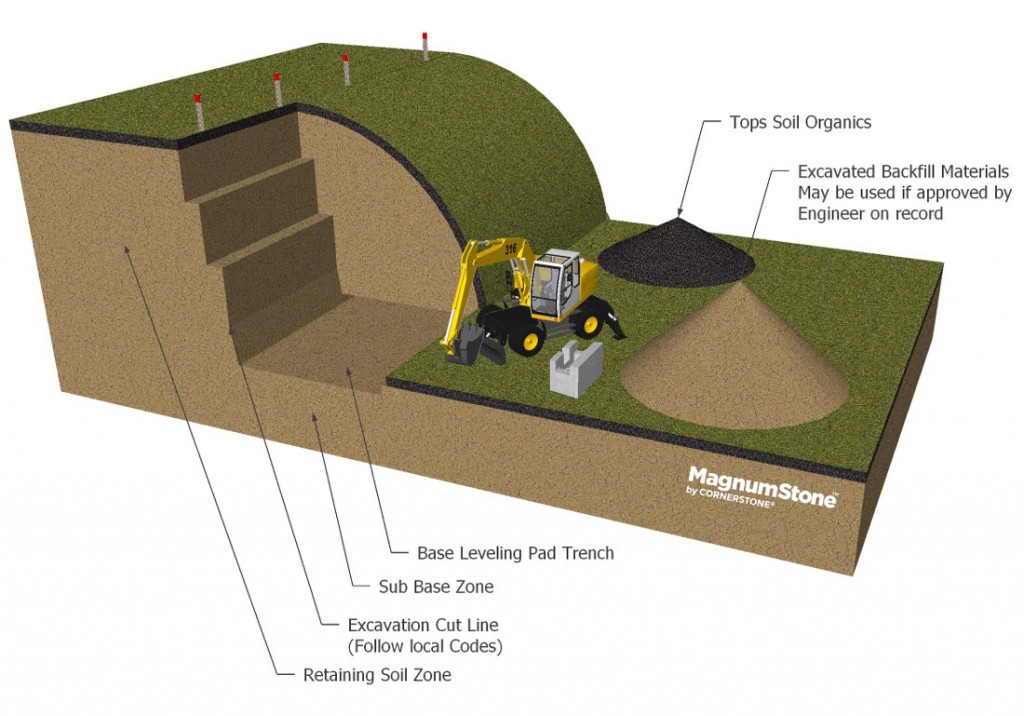
STEP 1 | Planning The Gravity Retaining Wall
- Mark the bottom and top of the gravity retaining wall excavation location with spray paint or stakes
- Establish proper elevation points for both the bottom and top of the wall before starting excavation
- Organic Materials should not be used in any Backfill Zones
- Store and protect good quality Backfill Materials from inclement weather during construction

STEP 2 | Excavating The Gravity Retaining Wall
- Excavate and prepare Sub Base Levelling Trench 6 to 8″ (15 to 20cm) below first course. This will be filled with a good 3/4″ road base material.
- Figure 1 – The Leveling Pad Trench Depth should be cut out to approximately 6″ (15cm) from the back and and the front of the total depth of the base course. For instance, if your using a MaxumStone Standard Unit with 1 – 4 ft extender the leveling pad would be 72″ + 6″ (front) + 6″ (Back) for a total trench width of 84″ (183cm + 15cm + 15cm = 213cm)
- Typical retaining wall burial depth or embedment Depth is 6″ to 12″ (15 to 30cm). Follow engineers cross section details or design parameters to ensure the correct embedment depth is being followed.
- Excavate cut line to a 2 to 1 slope or greater. Check with local codes and regulations to ensure they are being followed correctly.

STEP 3 | Sub Base and Base Stabilization Fabrics
- Compact Sub Base to 95% Standard Proctor Density or greater
- Remove any Organic or poor soils in the Sub Base and replace with proper reinforced fill materials before compacting
- (Optional) place 5′ to 6′ wide Base Stabilization Fabric on top of leveling pad trench
- Base Stabilization Fabrics will help prevent sub base materials from mixing with the gravel base leveling pad during compaction
- Fabric also provides extra Structural Bearing Stability to the base leveling pad

STEP 4 | Compact Gravel Leveling Pad
- Typically a 3/4″ (20mm) road crush gravel or equivalent is used for the base leveling pad
- Compact Gravel Leveling Pad to 95% Standard Proctor Density or greater
- Correct Moisture Content in the gravel will help in reaching proper compaction
- It is crucial that the base is level front to back and side to side. Any imperfections will be exaggerated as the wall goes taller

STEP 5 | Laying First Course of the Gravity Retaining Wall
- Remove the Screed Pipes from the leveling pad
- Place a steel stake at either end of the leveling pad to establish the back of the first course of units
- Secure tightly a string line to the stakes at either end which will provide the guide to line up the back of each MaxumStone™ base unit
- The distance of the string line between the steel stakes may vary due to heavy winds
- MaxumStone™ base units, placed on the leveling pad, are manufactured without SecureLugs
- Place each unit on top of the leveling pad in such a way as not to disturb the level gravel

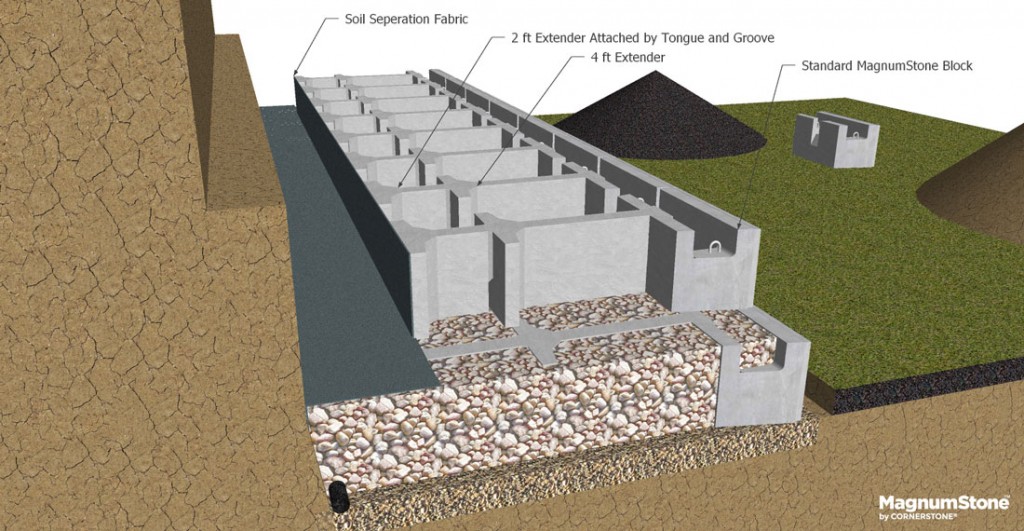
STEP 6 | Installing Extender Units to MaxumStone™ Block
- Place the tongue of the extender block inside the groove of the MaxumStone Base Block If extender to extender blocks are required place them in the same manner as the previous ensuring that the blocks stay level and true.


STEP 7 | Complete Base Row Installation
- Place the next MaxumStone Retaining Wall blocks level and aligned front to back and side to side
- Install the MaxumStone base block on the leveling pad. The base block should not have the lugs on the bottom. Ensure that the blocks are level front to back and side to side.
- Complete the first course of the gravity retaining and all extender units that are in the design.


STEP 8 | Drain Pipe Options and Uses for Gravity Retaining Wall
- Option #1
- A fabric wrapped or Perforated Drain Pipe should have adequate slope to drain water in the right direction towards each Drain Pipe Outlet
- Drain Pipe Outlet can be every 30 or 50 feet
- Perforated Drain Pipe, laid in the Horizontal Cores, can be a Sock Wrapped system to help prevent fines from migrating into the pipe
- Option #2
- A fabric wrapped or perforated drain pipe may also be placed at the back of the of the retaining wall blocks near the excavation cut line

STEP 9 | Backfill the Gravity Retaining Wall
- Backfill the MaxumStone blocks and extender units with a clear crush gravel (#57 Stone) or equivalent slightly above the units. Run a plate vibratory compactor over the stones and units allowing them to settle in the hollow cores. Sweep any excess stones off the top of the units and blocks.

STEP 10 | Installing Soil Separation Fabrics
- Install a soil separating fabric (Filter Fabrics) to separate the fines and compacted backfill material from the drainage aggregate. The filter fabric can be installed directly behind the MaxumStone extender units. They can also be installed directly on top of the drainage gravels.

STEP 11 | Installing Next MaxumStone Row of Retaining Wall Blocks
- Lay the Next row on a running Bond pattern with the SecureLugs Connected in the hollow core below. The SecureLug Connection provides a strong block to block connection and alignment throughout building your retaining wall.

STEP 12 | Continue Installation of Retaining Wall Blocks
- Continue to place the MaxumStone blocks on top of the retaining wall blocks below. Ensure they are level front to back ans side to side. Small adjustments may need to be made during the construction process. Soil separation fabrics can be added wherever the backfill meets the drainage gravel to keep fines from migrating into the drainage zone.
STEP 13 | Backfill and Compact Approved
- Compact the approved backfill materials in between the excavation cut zone and the back of the retaining wall blocks. Ensure that it compacted in lifts of no more that 8″ and also compacted to 95% standard proctor density. It is crucial that these areas do not have loose fill where settlement can occur.

STEP 14 | Continue Installation of MaxumStone Big Block Gravity Retaining Wall
- Continue the installation of MaxumStone big block gravity retaining wall as per the design provided. Cross section drawings will show you where the units are placed in order of depth.

STEP 15 | Continue Installation of MaxumStone Big Block Gravity Retaining Wall
- Continue the installation of MaxumStone big block gravity retaining wall as per the design provided. Cross section drawings will show you where the units are placed in order of depth.

STEP 16 | Top Block of Gravity Retaining Wall
- Install the top MaxumStone retaining wall block like the rest of the wall. The top block will not have the back edge on the top. This is the location that the soil separation fabric will lay to protect the hollow core and drainage channel of the block.

STEP 17 | Finish Your Gravity Retaining Wall
- Grade the final elevations of your gravity retaining wall.